
You have your manuscript all debugged edited and proofed, sorted out your cover. Before you rush over to hit publish, there’s this thing about producing your book — making the paperback and ebook files.
Sure, you could just upload your Word file. In terms of book design, that’s the equivalent of using spell-check for editing and a stock image for a cover. It’s not hard to do better.
In the past year alone, I’ve produced 3 books: Felix’s latest adventure In Victrix, the It Takes A Village anthology, and the upcoming Rainbows Aren’t Just For Leprechauns anthology. I’ve also worked with Eric Klein on his next book, Just Two.
This post is about the tools and techniques I used now (and have used in the past), and how to up your game when it comes to producing professional-looking novels. Since tools change and every time I both learn more and re-learn what I forgot, half the point of this post is to remind my future self about some of the gotchas and workaround. Readers are invited to stare in awe at my OCD-like obsession with proper layout, while I tearily chant to myself that good design is invisible.
Bit o’history (and the basics)
While I pay for professional editors and cover designers, one of the reasons I chose to do book layouts myself is that for the past 20 years in my day job I’ve been looking at the insides of documents (Word, HTML, PDFs) to have a good understanding of how they technically work, as well ‘just enough’ eye for design to create a good looking book. That said, you can get quite a lot done without getting overly technical.
The first step is to understand heading structure and styles. You can do this in Word, Open Office, Pages or almost any modern desktop editor. Rather than directly formatting text (bold, size, etc) you should create a named style, and then apply it consistently when you use similar formatting. You can then identify text in that style, and change in once place to affect all (eg change how all chapter headings look like).
Of particular notes are the heading styles (Heading 1, Heading 2), which are used to structure a document and create tables of content, page breaks, etc. If you consistently use the headings for chapters, it makes it much easier down the track for any software to correctly understand and translate your manuscript into a different format.
If you get headings structure and styles right, you’re doing well!
It’s at least translatable to an ebook or PDF in a way that doesn’t look like canned spaghetti, and what remains is making it look professional.
That last 20%, however, accounts for 80% of the hair loss.
When I produced Murder In Absentia, I imported my yWriter manuscript to Scrivener and used it to export the ebook, and used Adobe’s InDesign for the paperback. For In Numina, I wrote the manuscript in Scrivener and used InDesign for both ebook and paperback. It has a nice feature of conditional text, and can export well to both formats.
But that was a while ago, while I (or my wife) had Adobe licenses through work. Since I can’t justify the cost of it, I’ve since moved to Affinity Publisher by Serif. The whole suite (a replacement for Adobe’s Photoshop, InDesign, and Illustrator) is really great — it’s a once off cost (not a subscription), does almost all I need (I’m not a professional graphic designer who needs super complex functions), and knowledge from Adobe products is mostly translatable. They routinely have 50% off deals, so I grabbed the whole suite and am very happy with it. Someone really understood the needs of the mid-market, and build a rock solid program.
The main drawback is that Affinity Publisher doesn’t yet export to ePub. They have indicated that they are exploring adding this feature, but no promises on when they’ll ship it.
The other note is that I almost always tweak ebook files in Calibre. Good as the export functions are, there’s always a bit of extra love required to massage the files to perfection. I find Calibre more robust and easier than Sigil, and I use it anyway to manage my ebook library. Sigil tends to be a bit more technical and ‘geeky,’ but if you’re not using Calibre for ebook management then it might be a good solution for you.
Production process
We’ll discuss the specifics of each tool in a moment, but to visualise the general process:
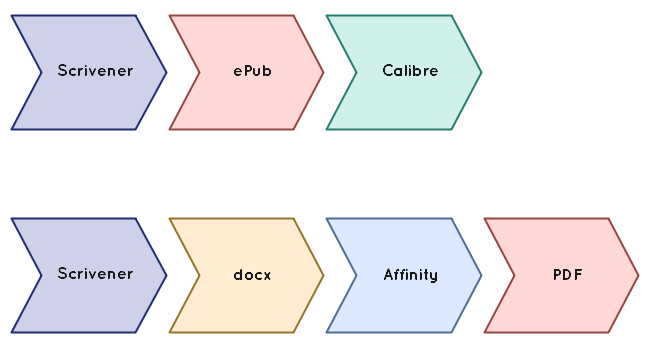
Writing in Scrivener (or other dedicated software) allows you to concentrate on scenes, chapters, parts, and track other plans and progress whether you’re a pantser or a plotter. For fiction you normally don’t care much about anything besides italics and chapter breaks while writing. Then comes the export into a format that’s digestable by other services, which is the point of this post.
Scrivener has a very clean export to ePub (in terms of the underlying HTML it creates), which is better than the one Calibre produces when it converts a Word file to ebook. With Affinity Publisher, you do have to go through an intermediary format, though.
Scrivener Compile
OK, let’s face it. Scrivener’s Compile function is intimidating. Powerful, definitely, but not easy to master. Luckily, there is a lot of helpful information in the form of manuals, tutorials, and how-to across blogs and videos.
With a bit of effort you can get a very decent result directly out of Scrivener, probably about 90% there. This depends on how complex the book you are formatting. For a simple novel with just some front matter and a sequence of chapters, it might be enough. For an anthology like I’m building now (with stories, each with an introduction, chapters & scenes, about sections, et al), or when graphics / complex text are needed, it can get tiring pretty fast.
I don’t think you would ever be able to get to perfection with Scrivener alone. It is, after all, primarily a writing software and not a layout program. So there’s a bit of diminishing returns, and at some point it’s easier to just jump ahead to the next tool where you can finish the job quicker. All you want to do here is get to a state where it’s not an utter pain to do the layout in Affinity / Calibre, where chapter headings are easily identifiable and basic formatting is preserved and easy to work with. FWIW, I can’t wait till Affinity solve the reflowable text for ebooks, so I can go back to having a single master that exports to both PDFs and ePubs.
So some tips to get you through the Scrivener compile maze:
- Pick one of the built-in formats (like “
Manuscript (Times)“), which you can duplicate and customise. - Page breaks, titles, and text are controlled in a general manner by the “Section Layouts”. You can assign them to object types (like chapter/folders or scenes/documents) from the bottom in the middle of the screen.
- You can create new types once you edit the format. Pick the closest section layout and hit the + button, and then name and edit it. This is recommended if you want to create separate formatting for similar objects. Eg if you want to have folders for parts and for chapters, or change just the formatting of the the first paragraph in a chapter (and not just the first paragraph in every scene).
Because these are on different screens (the “Assign Section Layouts” from the Compile dialog, and the “Section Layouts” tab in the format options dialog) there’s a bit of jumping around. You have to know the layout types you need, go into the format’s options and create new layouts, and then go back out to assign them. - Under ‘Title Options” you can set for example automatic chapter numbering. There are a lot of options. I wish I discovered the auto-numbering in Roman numerals before I ran out of fingers.
- I suggest renaming layouts to match the section type, and not reusing them. You can name the section types and create new ones when you click on a document in the binder (left-side tree) or the outline view.
- You can set custom separators between scenes, but if you’re planning on using a layout program (eg Affinity) then anything easy to find like a # sign or *** might be enough.
- Styles don’t seem to be the same style as the ones in the editor view. You’ll need to restyle things. For each compile style, make sure you fill in the “Override name” field. That will ensure it creates a corresponding style in eg the Word file. (Otherwise you end up with what looks like a heading, but Word/Calibre won’t recognise them as such; silly behaviour!)
- Also note that since styles are different, and that there are Paragraph, Character, and Paragraph-Charatcer (combined) style, it’s best to double check the output to ensure italics and anything else fancy made it through. As long as it created the right style (either paragraph or character) in Word and hasn’t decided to over-ride them, you should be able to edit appearances from a central place.
- Some options seems a bit fiddly (like capitalising the first few words). Scrivener doesn’t have options for drop-caps (which I swore I’ll never do again anyway). Those kind of fancy options are much easier to handle in Affinity.
- If you at this point you try to just export to ePub instead of a docs file, you’ll find you need to do a similar exercise as the list of formats available changed🤦
You might be tempted to instead edit the format, and click the gear icon on the top left next to the drop-down that says “docx” and then check the ebook options. That, unfortunately, results in wrong HTML headings which won’t help you (eg instead of an H1 element for headings, it will be ‘<p class="heading-1"...>‘ — which isn’t right or helpful).
On the bright side, by now you should be adept. Create section layout to match the section types (and based on the built-in styles in regards to page breaks). Assign them appropriately. And then edit the format appearance by assigning header paragraph styles to the header element in the format options. - If you’ve chosen a typical novel project format, you should have a “front matter” folder. You can create (and duplicate between) pages for title, copyright, etc. When compiling, you can select if and which bundle of front matter to include. That allows separating eg ISBNs. Just don’t forger to check which one you’re including when…
- You don’t have to compile the whole manuscript. On the Compile screen at the top of the right-hand side is a “Compile” drop-down, which you can use to select sub-folders. When I write short stories, I have a single project and then select just the one I want to export. You can also untick checkboxes if you want to exclude specific files.
If all this sounds like an incomprehensible headache… that’s because it is. If you’re adept at Word (or the editor of your choice), it might be faster to clean up after export. I like to maximise the utility of each tool, because I could then save the format options and reuse it in future books.
Then again, software changes and my memory fades, so half the purpose of this blog is to remind me of things next time.
Calibre
If you’ve done a the work in Scrivener, then you should have a pretty clean ePub file. You can then edit it in Sigil or Calibre. Note that you don’t have to add the book to Calibre. You can right click the file and just open it in “Calibre e-book editor” directly.
Scrivener tends to put an embedded “Contents” page right at the front, and then name all the files as “bodyXXX” sequentially. You’d want to rename them (title, copyright, chapter XX, etc) for easy reference. While you’re there, check that you’ve put in the right ISBN and other details for this edition.
Next, you should edit the table of contents. Remember I said above that Scrivener creates an inline (embedded) table of contents? Well, that’s not how ereaders navigate. You’ll need to also edit the actual TOC, which is stored in a specific format. Scrivener seems to do something screwy here, so (in either Calibre or Sigil) you should select Tools > Table of Contents > Edit TOC and fix it. Usually deleting everything there and then selecting all “major headings” should do the trick. I normally remove the inline TOC, but you can leave it or move it around.
You can also play with other tools, like embedding and subsetting fonts (possibly replacing, or at least adding generic types), running general checks and fixing any errors they find, and compressing images.
Lastly, make sure you add a cover (from the Tools menu). Don’t go crazy with the full high-res, but include something that would be legible on ereader screens.
Affinity Publisher
Ah, the joys of using a tool for the purpose it was built and designed. Here are some tips to a good book layout.
- Start a new project, and set the expected book trim size (eg 6×9″).
- Set “Facing pages” to help you visualise the spreads. (When you export, you’ll need to export as pages rather than spreads).
- Set margins: I usually go for 1″ or 0.85″ top and bottom (to have space for page numbers and book title), with 0.5″ outer margin and 0.75 inner margin (to account for the pages sticking together at the spine). That will look visually centred on the page once printed.
- DPI should be 300 for print. Don’t mess with colour profiles. You wouldn’t normally need bleed, unless you have illustrations running all the way to the edge of the printed page.
- Add pages and lay out elements for Title page, copyright, dedication, contents, and whatever other bits you want in the front matter (anything before the story starts). Take a look at any physical book for ideas on what goes where. There pages are often numbered with small Roman numerals, while the story starts on numbered pages.
- Speaking of numbering, those are set in the Master Pages. I usually have a blank master for the front pages, and then one with headers & footers for the rest. You can right click a page and select “New Section”, and reset page numbers & masters between sections if needed.
- You can import a docx file in a way that auto-creates pages. Create a text box within a page, covering all the margins. The cursor should then be ready to type. Select File > Place. It should place it inside, if not just click inside the text box.
At this point it should show a small red triangle near the bottom of the right-hand margin. Shift-click it, and Affinity would create new pages for all the overflow text. (If you have pages after the current page, it will add them at the end of the document — so make sure you do this on the last page, or prepare to shuffle things around). - Use styles everywhere!
- Search for all characters in italics, and replace them with the emphasis character style applied. This is a bit fussy, but important — when you later apply paragraph styles, they may override directly formatted text (eg italics) but will respect the emphasis character style.
- If you’ve set styles in Scrivener or Word, you’ll likely find them present in Affinity. If they don’t display quite right, edit them from the styles panel to tweak properties for all. Make sure to apply chapter headings etc.
- You can make certain styles (like chapter headings) start on even or odd pages only. (Under “Flow” in the paragraph options).
- Fix up front matter. Scroll and check for rogue page breaks. Add a TOC from the right heading styles as makes sense (eg while in an ebook you might include all chapters, in a paperback I find it a bit useless and so I only include ‘named’ things — like acts in my novels or stories in the anthologies).
- Export to PDF. Select PDF/X which is the sub-type for print (PDF/X-1a:2003, which all printers would accept and unless you’re doing something funky should be pretty WYSIWYG).
Don’t forget to change the Area from “all spreads” to “All pages” for correct print layout for novels. I wish Publisher would remember that!
Summary
This ended up a bit longer than I expected, even when I reduced it to a list of tips and gotchas. In practice, there’s a lot of try-export-check-fix cycles to get it right.
Like lot of good design, when it’s good it’s invisible — it just feels nice and natural and you can sink into it. But when it’s not, something feels off. Even when you can’t place your finger on it. While there are obvious diminishing returns, it doesn’t take a lot to step up your game and make your novels looks professional.
If you’re struggling, you can always reach out. I love to help 😊
Would you like to see what the results of all these efforts look like? Why not treat yourself for a signed and personally dedicated paperback?
